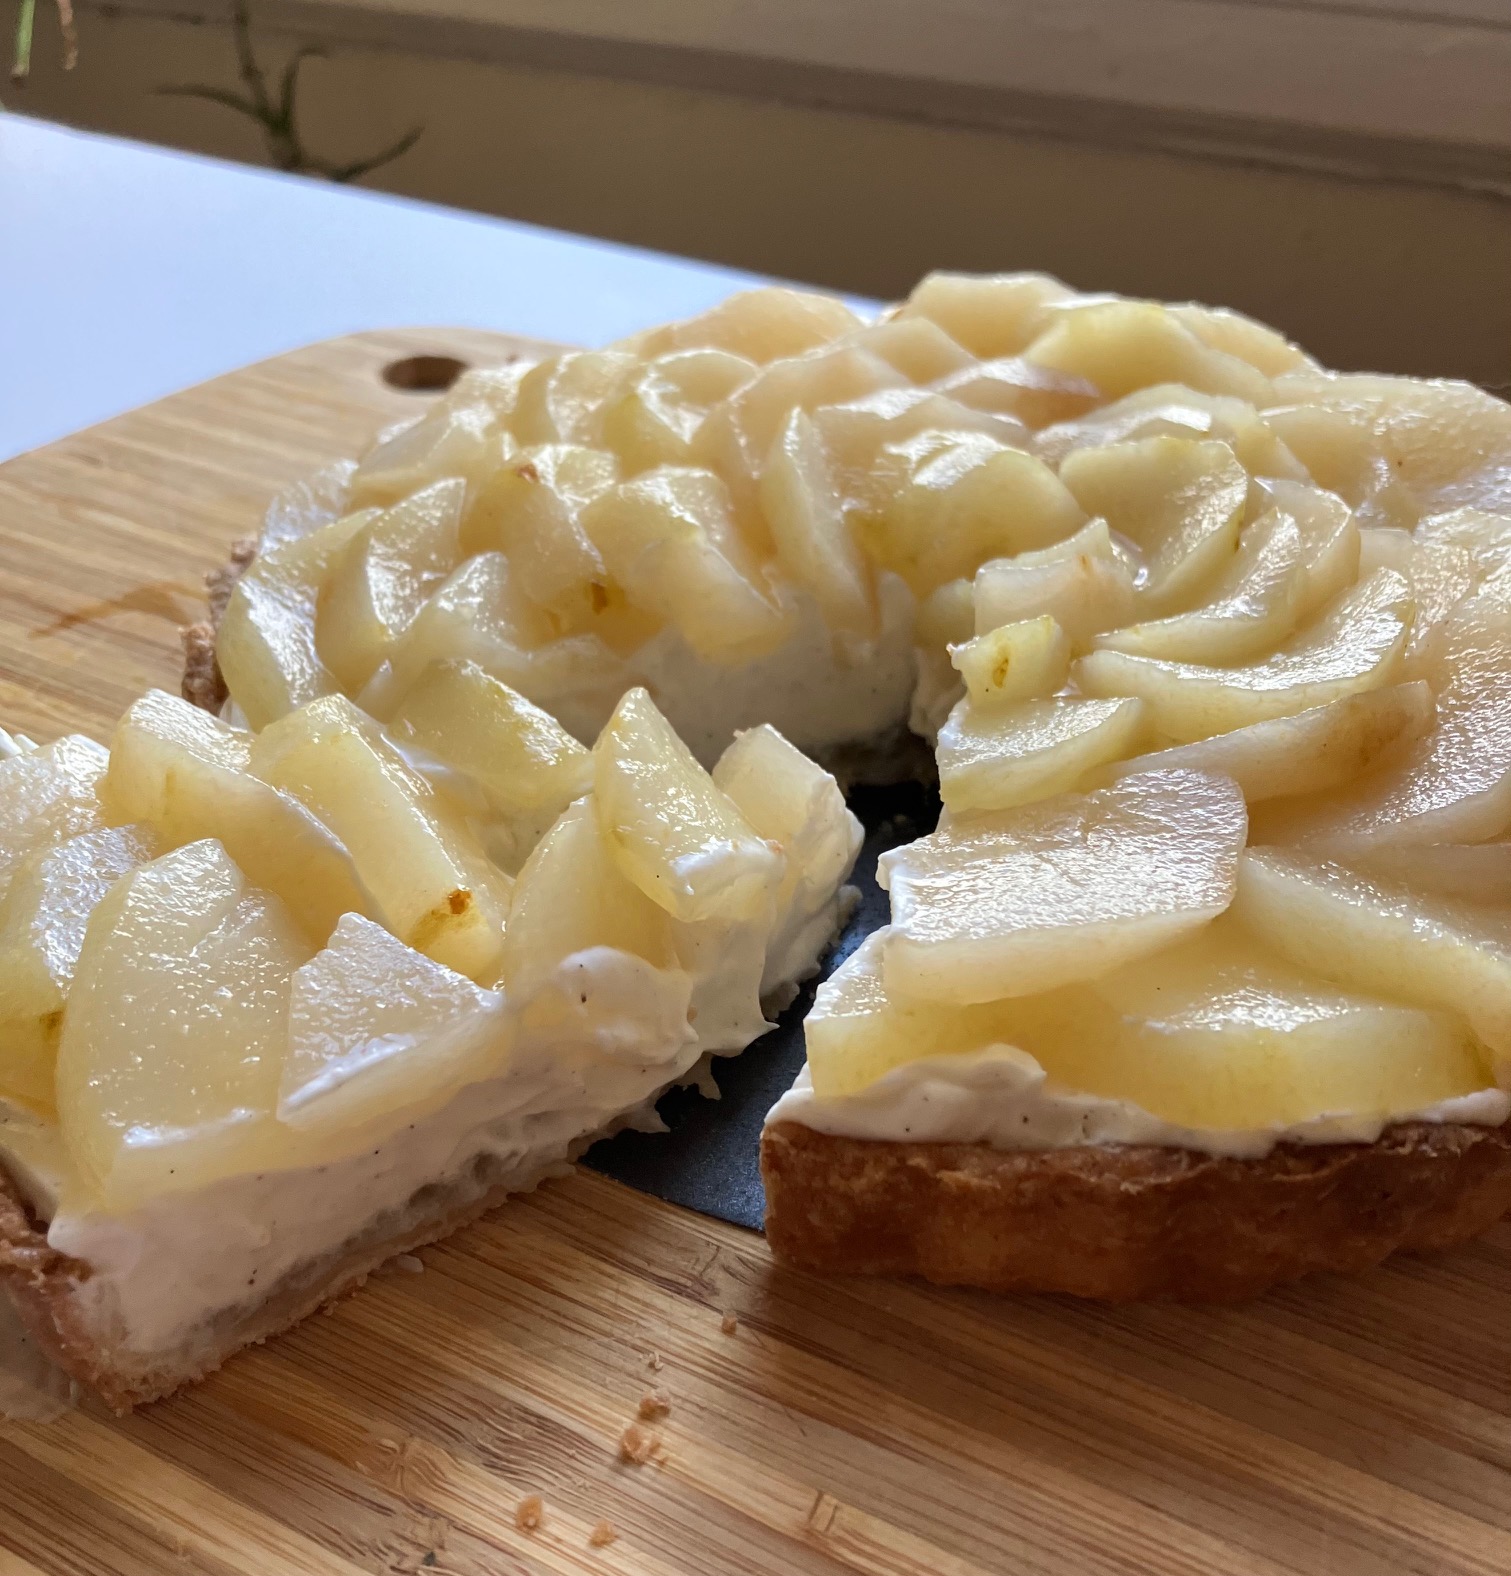
If you’re looking for the ultimate pear tart recipe, look no further. Since pears have a rather mild flavor, I find they are often overshadowed in desserts and act more as a nice topping than the star of the show. My goal for this poached pear tart was to find multiple ways to layer in pear flavor for a multidimensional dessert that celebrates fresh, seasonal pears.
This poached pear tart allows the pear flavor to shine through with both a pear compote at the base of the tart and layers of poached pear slices across the top. Syrup from the poached pears is reduced and both incorporated into the cream as a lightly spiced sweetener and brushed atop the pears for a stunning glaze. The creamy center adds extra richness and compliments the pears with subtle hints of honey and vanilla.
This tart requires a little extra care to assemble so is perfect for the holidays or a special occasion. The pears add a refreshingly light note to the dessert, making it a great end to a meal. The process of poaching the pears, making your own compote, and assembling the tart is incredibly rewarding and each stage is meditative in its own way. The tart also keeps very well for several days and tastes even better the day after it’s made!
The perfect poached pear tart
Course: Pies and tartsDifficulty: Weekend baking project1
8-inch tart2
hours1
hour30
minutesThis poached pear tart is bursting with fresh pear flavor and has a layer of spiced pear compote followed by creamy honey mascarpone, and topped with slices of poached pear drizzled with the poaching syrup. It is the perfect holiday or special occasion tart when pears are in season during late fall and winter. Be sure to use Bosc pears, which are much firmer than Bartlett and hold up well for poaching–if your pears are not quite ripe they should also do well with the poaching method.
Ingredients
- For the pears
6 bosc pears, peeled and cored
1 1/2 quarts water
1 1/3 cup (266g) granulated sugar
3 Tbsp honey
8 slices ginger (fresh or frozen)
1 Tbsp green cardamom pods, crushed
1/2 a lemon, thinly sliced
A few cracks of black pepper
- For the tart shell
1 1/4 cups (156g) all-purpose flour
1/3 cup (66g) granulated sugar
1/4 tsp salt
8 Tbsp cold butter, cubed
1 egg yolk
2 Tbsp ice water
1 tsp vanilla extract
- For the mascarpone cream
5 oz (141g) of mascarpone
1/3 cup chilled heavy cream
2 Tbsp honey
1 1/2 Tbsp poaching syrup
1/4 tsp ground cardamom
1 1/2 tsp vanilla extract
Instructions
- Poach the pears
- In a large pot or dutch oven, add the water, sugar, honey, ginger, crushed cardamom pods, lemon slices, and black pepper. Heat over medium heat, stirring occasionally until the sugar is dissolved.
- Meanwhile, cut 4 of the peeled and cored pears in half and set aside. Dice the remaining two pears. Add all of the pears to the poaching liquid once the sugar has dissolved. Take a piece of parchment paper and fold in half diagonally to create a triangle. Fold in half again along the folded edge several times until you have a small triangle. Line up the point of the triangle with the center of your pan and cut the base of the triangle to align with the edge of the pan. Then snip off the point to create a small hole in the middle. Unfold and place the parchment over the pears in the pot. It should fit well inside the pot and have a hole in the middle.
- Simmer the pears for about 15-25 minutes, occasionally pressing down on the parchment with the back of a spoon to make sure the pears are submerged. The pears are ready when a knife inserted into them glides through easily. If you feel there’s quite a bit of resistance, keep cooking.
- Let the pears cool in the cooking liquid and then place into a container. Strain the poaching liquid and pour over the pears and store overnight in the refrigerator and up to a couple of days. If you have a little bit too much liquid to fit into the container, you can discard some of the extra or use it for something else.
- Make the pear compote
- Take the poached pears out of the fridge (they should have soaked in the leftover poaching liquid for at least 12-24 hours). In a saucepan, add the diced pears only (NOT the pear halves) along with all of the leftover poaching liquid. Bring to a boil and cook for about 20 minutes until the liquid has reduced by at least half and is a bit more syrupy.
- Strain out the liquid into a separate container. Place the diced pears into a bowl and mash with a fork. Add a splash of the reduced syrup (2 Tbsp or so) to the mashed pears and stir together. The consistency will look like applesauce. Set aside the mashed pear compote for the next step. Reserve the remaining poaching syrup for later.
- Make the tart shell
- In a mixing bowl, stir together the flour, sugar, and salt. Add the cold butter and using a pastry blender or a fork and knife, break up the pieces of butter into the flour mixture until the pieces are no larger than the size of a pea.
- Quickly mix together the ice water, egg yolk and vanilla. Pour into the flour mixture and mix together with a fork. Gather the dough into a ball with your hands and pat into a disk If you find the dough is sticky or got quite warm when you were mixing it, refrigerate it for at least 15-20 minutes before trying to roll it out. Otherwise, you can go ahead and roll out into a round slightly larger than your tart pan on a lightly floured surface. Gently fold in half and transfer onto the tart pan. Unfold and pat down the dough into the bottom and up the sides of the pan. Run a rolling pin over the top to remove excess dough and set aside in case you need to patch later.
- Prick the dough with a fork along the bottom and sides and freeze for at least 10-15 minutes or refrigerate for 30 minutes before baking.
- Preheat the oven to 375F. Line the bottom of the tart pan with foil or parchment paper and place some baking weights on top to fully fill the pan (I often use dried rice or beans). Bake for 20-30 minutes, until the center is slightly golden. Remove the pie weights. If you see little holes or cracks in the crust, you can gently smear a tiny amount of the leftover tart dough to fill in the gaps. Spread all of the pear compote over the crust and bake for 5-7 minutes more until the crust in a nice golden brown. Let cool completely.
- Assemble the tart
- In a large mixing bowl, add the mascarpone, heavy cream, honey, 1 1/2 Tbsp of the poaching liquid, ground cardamom, and vanilla. Beat very lightly on the lowest setting with an electric mixer until peaks begin to form, about 2 minutes. If you beat at a high speed, the mascarpone may curdle, so take it slow.
- Spread the filling into the cooled crust on top of the compote.
- Place the poached pear halves onto a cutting board and make thin slices width-wise. Arrange the slices, slightly overlapping, around the top of the tart in concentric circles, using the wider slices for the outer rings and the smaller slices as you move inwards.
- Using a pastry brush, brush the tops of the pears generously with the poaching syrup. Refrigerate the tart for about two hours to allow the tart to fully set. The tart will last for several days in the refrigerator, covered with plastic wrap.
Notes
- Make ahead: The pears can be poached 1-3 days before you’re ready to serve the dessert and gather extra flavor from sitting in their poaching liquid. The compote can also be made a day or two in advance, but should not be made until the poached pears have had at least 12-24 hours to sit in their poaching liquid. You can make the tart dough the day before and simply roll it out and bake the day you’re ready to serve.
- You will have leftover reduced poaching syrup after this recipe. You can try drizzling it on top of yogurt or vanilla ice cream or on top of fresh diced pears as a snack.



Leave a comment